
4.30.2010
It’s Official – I am a year older!!! =) LOL
...but i am at work right now. Just cant wait to be home and then out partying! =)
4.26.2010
Sephora Beauty Insider Birthday Gift!
Mine is coming up so i got an email from Sephora saying there's a gift waiting for me, just go and pick it up LOL. So here it is :
- Lash Plumper Volumizing Mascara in Black
- Nano Eyeliner in Silver Green
- Colorful Mono Eyeshadow in Aspen Summit
- Nano Eyeliner in Silver Green
- Colorful Mono Eyeshadow in Aspen Summit
I am just not feeling the Silver Green eyeliner. The color is too light. But I like the Aspen Summit for inner corner color or lid. =)The mascara is also nice. But i like my Loreal Voluminous better.


4.25.2010
FOTD: I curled my hair LOL - tired of having it straight and sleek!
My boyfriend likes my hair all pouffy and wavy..so i did it today after wearing my hair straight for weeks! Since my hair is already straight to begin with (thanks to Japanese Thermal Reconditioning), it is so easy for me to curl it. Just plug in my curling iron and in 5 minutes my hair is big and wavy LOL. It used to take me 1-2 hours to get ready because i had to blow dry my hair first, then flat iron it, and then the final step - curl my hair with a curling iron. Such a time consuming!


4.24.2010
Black and White Dress : Nicole Miller VS. Forever 21
I came across this one Forever 21 dress that is a dead ringer to Nicole Miller's Black and White party dress. But if you really look closer and pay attention to the details, the design is different. =) For those who prefer the less expensive version of designer dresses, I'd go to Forever 21 since the co. gives variety of options =) And they are so damn cute!!
Nicole Miller's Dress worn by my friend, Amy:


Created to be a show stopping party dress, this strapless silk organza dress features a floral chantilly lace overlay and a cloth covered belt with matching bow decoration at the waist. Boning in the bodice seams. Hidden back zipper. Fully lined. Medium weight. Woven.
Price: $42.80
And I believe this is Betsey Johnson's dress worn by Paris:

Nicole Miller's Dress worn by my friend, Amy:

Forever 21 Dress:
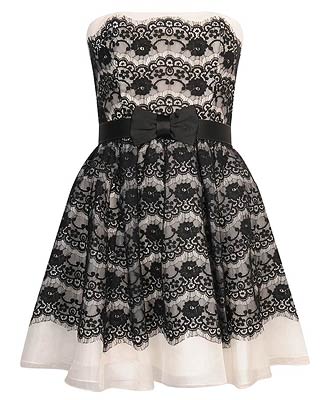
Created to be a show stopping party dress, this strapless silk organza dress features a floral chantilly lace overlay and a cloth covered belt with matching bow decoration at the waist. Boning in the bodice seams. Hidden back zipper. Fully lined. Medium weight. Woven.
Price: $42.80
And I believe this is Betsey Johnson's dress worn by Paris:

4.22.2010
Laura Mercier - Foundation Primer

Foundation Primer - Oil Free
This lightweight, water-based primer creates a smooth, invisible layer that acts as a buffer between the skin and makeup. Specialized for oily, sensitive, and acne-prone skin types, its high water content soothes surface dehydration around active blemishes.
My Conclusion: I have used Tinted Moisturizer from this line before. Retail $42 - too sheer, not my thing. Besides it gave tiny bumps on my skin. Guess i am allergic to some ingredients in it. So I returned the product. I also had tried the Secret Camouflage concealer and it seemed to work. I was actually skeptical at first as i never really liked any primer. I tried Smashbox, and MAC, and some other unknown brands and i thought I'd be better off. They are silicone based and my skin reacted to it - i got ZITS! However, this one doesn't even give me 1 tiny zit and I have been using it for 3 days. YES!! My fear of wearing a primer is over. I'd definitely buy a full size product once i am done with this sample. Oh yeah, it does provide a nice canvas before i apply Bare Minerals =)
FAKE? MAC Hello Kitty Collection.
Normally I can spot a fake item from far LOL ( I have that ability ;) ) but I wanted this limited edition so much that i didnt even care to look at the lipstick real closer. I grabbed and paid the third party seller. It's not her fault i know, but is this fake????? I think it is!


4.20.2010
Thought of the moment: Damon Salvatore
I don’t really fancy Edward Cullen a.k.a Robert Pattinson that much, though I lovveee the story of Twilight; however, I really think that Damon Salvatore a.k.a Ian Somerhalder from The Vampire Diaries is quite dashing. HaHa =)
Vampire Diaries – yep my favorite TV show

In Ralph Lauren:

Vampire Diaries – yep my favorite TV show

In Ralph Lauren:

Brazilian Blowout Acai Anti - Frizz Shampoo.
So i got this product (cost $37.32 with tax) because i just did Japanese Thermal Reconditioning, and I really need a super good shampoo that keeps my hair smooth, straight and shiny. Well, this guy at Beauty Essentials, Sherman Oaks said that this Brazilian Blowout is the aftercare product made for the Brazilian Boa Hair Straightening/Keratin Treatment/Blow Out. He said I could use it for my hair too. Good deal, grabbed and paid. I bought the shampoo only though, the Acai Anti - Frizz since I still have my Redken Smooth Down conditioner that i bought 2 days earlier. Anyways, just like the Japanese Hair Straightening/Thermal Reconditioning, the Brazilian Keratin Treatment / Blow Out leaves hair straight, healthy and shiny; however only only up to 3 months. Japanese Thermal up to a year or until you chop your hair off! Except the roots, that will be curly of course. I think the cost is pretty much the same. I never tried Brazilian Keratin Hair treatment, but if the Brazilian Butt Lift is the most wanted procedure, I am sure their other stuff is also good too? Haha. But last up to 12 weeks?? I think I will be spending more money on Brazilian Blow Out!
My Verdict on the Brazilian Blow Out Acai Shampoo: Worth every penny. I dont think i could go back using the drugstore shampoos and conditioners. Haha. Simply because i am scared they will ruin my hair. =/ Too much cheap chemical. This luxurious shampoo makes my hair happy ahahaha =) It has no sulfate, which is a plus. Well, I used to change brands so often since I didnt like most of the products I tried, but that because I had thick, curly/wavy and hard to manage hair. Anyways, this Brazilian Blowout product leaves my hair ultra smooth, extremely shiny with no frizz just like the brand's statement on the bottle. Oh yeah, here is their website, http://www.brazilianblowout.com/

My Verdict on the Brazilian Blow Out Acai Shampoo: Worth every penny. I dont think i could go back using the drugstore shampoos and conditioners. Haha. Simply because i am scared they will ruin my hair. =/ Too much cheap chemical. This luxurious shampoo makes my hair happy ahahaha =) It has no sulfate, which is a plus. Well, I used to change brands so often since I didnt like most of the products I tried, but that because I had thick, curly/wavy and hard to manage hair. Anyways, this Brazilian Blowout product leaves my hair ultra smooth, extremely shiny with no frizz just like the brand's statement on the bottle. Oh yeah, here is their website, http://www.brazilianblowout.com/

4.18.2010
Back to Bare Minerals =)
As i mentioned in my previous post, I had a hard time finding a good match with the Bare Minerals foundation. However, my visit to Sephora yesterday did wonder! I didn't know Bare has come out with a new formulation, new colors and a new design! I like this new sifter design that prevents spills and leaks! (the old design can be pretty annoying - too messy). However, this new design comes with only SPF 15 Matte Foundation. If you want the original formula in this sifter design you can just forget it, since they dont make one. The price for Matte is slightly more than the original, which is $28 and of course i have to pair it with the Mineral Veil, a setting powder that costs $19 each. Am I happy?? YEAH. =) I found my color - The Golden Tan -(description: made for medium-to-tan skin with subtle yellow-olive undertones). MOI! One thing i like about Bare is that this product is formulated WITHOUT:- Parabens, Sulfates, Synthetic Fragrances, Synthetic Dyes, Petro-Chemicals, Phthalates. =)

New Packaging: With the innovative Click, Lock, Go™ component, you can take bareMinerals Matte SPF 15 Foundation everywhere you go—no spills, no leaks, no worries

4.17.2010

4.16.2010
Organic Matters!
I have becoming so conscious lately with what I use on my face and my body. I have a super sensitive acne prone skin, and yes oily skin sucks but, it does prevent your skin from aging too fast ;) . Last year my hormone went super crazy on me. I was constantly breaking out which became a huge issue so I did acutane for 6 months and my skin cleared up for most part!! I don’t want to continue taking acutane due to side effects, so maintaining my skin after acutane with topical RX is important. In my opinion, the most important thing is to use natural products that don’t cause breakouts of any kind. That seems to work so far. It sucks because I like using variety of stuff, but most products out there are filled with pore clogging ingredients and for that reason alone, I tend to be more careful now with what I use on my face. I have MAC, Chanel, Cinema Secrets, Nars and Revlon ColorStay foundations that I use occasionally, and/ or during the weekends. It’s quite heavy on my skin but of course the coverage is superb and it last all day =) That’s all I need LOL, for clubs and events. However, for everyday use, I prefer MAC Studio Fix Powder Foundation and Bare Escentuals/Minerals. Unfortunately, Studio Fix tends to cause mild zits that I dont really care much because the coverage is phenomenal! I just have to remember to take it off later at night when I get home and wash my face with tons of benzoyl peroxide and salicylic acid to prevent zits from forming. Bare Minerals that I have is way too dark on my skin. I use Medium Tan but the color seems muddy and it makes me look like I have way too much bronzer on my face, and I hate looking “dirty”! The Golden Medium that they have is slightly lighter than my skin color. =/ Since I don’t wanna buy both colors and mix it, I decided to buy Origins Mineral Powder to replace the Bare.
My Conclusion: It turns out great. =) At least I don’t have to do the 2 steps routine like the Bare Minerals: The Foundation and the Mineral Veil, ah way too much! I am into cutting “the steps” now days so one swipe/buff is all I need. So, it’s a Plus! It is sheer to medium coverage, all depending on how much you apply. I don’t like wearing heavy makeup at work so sheer to medium is good enough for me. You can go heavy if you layer it 3-4 times. =) Got blemishes? Just dab a creamy concealer prior to mineral makeup. The best part, it does give a nice subtle glow (I am not too crazy about shimmery and sheen). However, the only problem is the color range. Available Shades are: Light, medium, Medium-Deep and Deep, and I use Deep for my MAC NC42 skin.
Here is the info:
Multi-Grain™ Makeup Fortified with Oats, Vitamins & Minerals SPF 14
√ 91% agreed skin looked naturally radiant
√ 78% saw an improvement in their skin
Start skin’s day with the wholesome goodness of nutritious, organic Oatmeal (nature’s famed skin soother); Soy (a source of radiance); Tapioca and Rice Flour (to smooth and refine); plus Barley, Wheat Germ, Pomegranate, Goji Berry, Vitamins C and E and all-natural sunscreens (to fight skin-aging). The soft, finely-milled grains build and blend easily from sheer to full coverage. Won’t clog pores, cake or dry-out. Skin glows with good health.

4.13.2010
Just wanna share since i did my hair and very happy with it!
How to get your hair straightened using Japanese Thermal Reconditioning
http://www.ehow.com/how_5223489_hair-using-japanese-thermal-reconditioning.html
Before and After Japanese Thermal Reconditioning (Google Image)

Have you always wanted to wake up with perfect hair? Tired of others bragging about their wash and go hair while you suffer? Do you wish your hair wasn't so frizzy and unmanageable? Japanese Thermal Reconditioning can make it happen! It is well worth the money and time it takes. In the steps below I will walk you through the whole process.
Before and After Japanese Thermal Reconditioning (Google Image)
Have you always wanted to wake up with perfect hair? Tired of others bragging about their wash and go hair while you suffer? Do you wish your hair wasn't so frizzy and unmanageable? Japanese Thermal Reconditioning can make it happen! It is well worth the money and time it takes. In the steps below I will walk you through the whole process.
Difficulty: Moderately Easy
Instructions
Things You'll Need:
· Money
· Time
· Healthy unprocessed hair
· Desire for silky straight hair
· Good hairdresser
1. Step 1
Do serious research and make sure it's the right solution for you.
2. Step 2
Start saving because it isn't cheap. It can cost as low as $200 or up to $800 depending on the salon and your hair length.
3. Step 3
Find a reputable hairdresser who is certified in Thermal Reconditioning.
4. Step 4
Book a consultation appointment. This step is a must. If your hair's not in good condition, this process will only make it worse. Don't be afraid to ask questions.
5. Step 5
If all goes well with the consultation, book your Japanese Thermal Reconditioning appointment.
6. Step 6
On the day of your appointment collect some magazines or books and eat a good meal beforehand. You will be at the salon for 4+ hours.
7. Step 7
When you are settled in at the salon, your hairdresser will first apply activator to your hair and allow it to process for up to an hour.
8. Step 8
Next conditioner and heat protectant will be applied to your hair.
9. Step 9
After blow drying the hair, the hairdresser will straighten ½ inch sections of your hair at a time. This can take as long as 2 hours.
10. Step 10
At this point your hair will look perfectly straight and beautiful, but alas all that hard work is seemingly a waste as the hairdresser covers your head in neutralizer.
11. Step 11
After about 20 minutes, your hairdresser will wash the neutralizer out and re-straighten as needed.
12. Step 12
When it's done, run your hands through your hair! It'll be smoother than silk.
13. Step 13
For the next three days, do NOT get your hair wet, tuck it behind your ears, tie it back, or use any hair pins. You will want to keep your hair as straight as possible. You may straighten it with a hair straightener every morning to fix any hairs that have gone astray while you were sleeping. This will actually get you better results.
14. Step 14
After the three days are over, wash your hair using good quality shampoo and conditioner. Also, invest in a good deep conditioner. The better conditioned your hair is, the more it will shine.
15. Step 15
Enjoy your gorgeous locks!
4.12.2010
Japanese Rebonding - My Hair Story =)
Well, I don’t really fancy my natural wavy+curly locks even though some people might find it quite sexy. ;) Haha. Well, sexy if I take really good care of it, put tons of mousse, gel, etc but it’s a hard work really. It's too much! I just want to be able to wake up every a.m. and feel beautiful (I know, right? LOL) without having to fix my hair every morning. Such a dreamy thought!
Well, I normally spend 1-2 hours on my hair alone. Time spends on my makeup and picking out outfits is totally another story. My boyfriend always says that I am way too high maintenance for him, which I find it untrue. I like to look nice, that’s all. Who doesn’t? Until I got tired of fixing, and just went to work as it, put my hair up - the best solution i found. But really, my hair needs tons of work, so i am not really a high maintenance girl as he thinks! ;-P Normally, I would blow dry my hair, tame the frizz and put tons of mousse so it will look nice and pretty. That, if i am lazy ahaha. And the 2 hours routine would involve a hair dryer, a flat iron (CHI is the best!) and a touch of a curling iron (Milano rocks) so I could have that “perfect hair” look =). Wavy, sexy, tousled hair is my signature look (that's what my bf likes, he said that), and i will flat iron straight if I want that sleek and edgy hairdo. Such a hassle, and I could only do it when I am off work. LOL. The outcome is great though, of course with all that hefty effort. It just that I don’t wanna go through that routines anymore – I am tired of it all. Too much work!!
So, I decided that I want to cut down some steps; therefore, I opted to have my hair re-bonded. Yeah, you heard me right. REBONDED. This Japanese Rebonding (also called Japanese Straightening in the USA), is the one and only technology that allows your hair to stay straight to the max, literally forever until the new root shows up. LOL. Then, you can have your root retouched, but your re-bonded hair will stay like that until you chop it off. =) Neat, eh? This pin-straight hair style is so popular in Asia, besides the Digital Perm that I would like to try someday. However, this technology is so new in America (is it still? I think so!) so I’d say be careful with those salons that advertise Japanese Straightening/Rebonding. I don’t really trust them. I don’t think it’s the same technology. =/ Maybe yes? Still, I am not going to take a chance, especially if they charge over $600 for it. I have to confess that I had it done once, at *TOOT* ( i wont bash any salon), few years back and poof it didn;’t last. This salon is one of the biggest salons in LA, and they did advertise it as Japanese Straightening. Later, i found out that it was just a regular perm. Haha. Why? Because my hair went back to its original state within few months, 2 months to be exact! Grrr.
Anyways, I had my first experience with Japanese Rebonding in 2001. I had my hair done at SNIPS. http://www.snips.com.my/ SNIPS ROCKED MY WORLD FOR YEAAARRRSS!! LOL. The last Japanese Rebonding i had was back in 2006 (at Snips, again), when I went back home to visit my family. However, between 2006-2008, I went to regular salons in LA to get my hair done. I had my hair permed, waved, etc and some I liked, and some I didn’t. In 2009, I basically was in this dormant mode =`( and I didnt wanna do much. I didn;t care much about my hair really. But things have changed now, and i am so excited about life and doing the girly stuff again. =)=) Due to that, I decided to visit Kim Sun Soung salon last week. That after Milli told me many times to go and get my hair done! Haha. Technically, it should be called a Korean Rebonding LOL since it's a Korean salon, but they use Japanese stuff, so?? =P. And yep, my hair is glorious again, (thank god, finally) and I am looking forward to waking up in the morning =P. Haha. Why?? That's because I really don’t have to spend much time on my hair like i used to. Yay!. Just get up, hit the shower, blow dry ( so far, my hair is pin straight no matter what and i am keeping my fingers crossed, for it to stay like this forever!), make up and head to the office! Hehe.
And thanks Elim. You’re such a sweetheart! I had a pleasant experience at the salon and that 5 hours went by so fast! LOL. I'd go back anytime! =) P.S Yeah, the process normally takes up to 5 hours!
PS - Here is the website: http://kimsunyoung.com/
and here is the result: =) I am happier than ever!

Subscribe to:
Posts (Atom)